Pressing Considerations for the Older Lifter

Pressing Considerations for the Older Lifter
Part 1
Everyday I get about 20 emails from guys who have shoulder issues. Sometimes it is from an old {insert any sport here} injury, while the other emails detail a bad benching experience.
These guys are in serious pain yet they will not stop benching. They keep pushing through the pain, flaring their elbows and shortening the range of motion.
In this multi-part article series, I hope to offer some important tactical strategies and alternatives for the older lifter who has been in pain and struggling with any type of pressing movement.
Let’s get started.
Tip #1: You Must Have a Good Warm-up
I mean really, this should go without saying. If you’ve been part of #teamdiesel for a while, you know the warm-up is critical for everyone.
It sets up everything that happens in the workout and helps to overcome all the bad stuff we did all day. You know, like slouch in your chair watching YouTube videos and LIKE’ing stuff on Facebook.
I’m not going to tell you how the warm-up charges up your CNS, increases your soft-tissue quality and extensibility, improves your posture, activates inhibited muscle groups and yadda yadda yadda. You already know all that.
It is important. Do it.
Start general and slow and more to specific and fast. It should progress and ramp up right into / or continue during the workout (auto-regulation).
3 Insanely Effective, FAST Upper Body Warm-ups
Tip #2: Improve Your Thoracic Mobility
This can be done during the warm-up and throughout the workout.
When our thoracic spine gets locked up, it affects everything. It is a trickle down effect that has ramifications across the kinetic chain. Specifically for benching, we can’t get in a good position with our torso to create proper stability, we can’t move our shoulder blades into a good packed and down position and we can’t prevent excessive humeral extension at the bottom of the movement.
We lose thoracic extension and rotation for a number of reasons, including poor breathing habits, long term poor posture, poor hydration and hypertonic muscles that negatively impact the quality of our upper body movements. The list goes on and on.
Quick Ripple Effect
To see how just one of these reasons can devastate our posture and movement, let’s look at poor breathing habits.
Poor breathing habits => destabilize the core (affecting intra-abominal pressure and inner core stability) => create overactive muscles (traps and spinal erectors, further facilitating Janda’s predictable patterns of dysfunction, upper and lower cross syndromes) => change the slideability of our soft-tissues (stiffen, glued down, the mechanoreceptors and smooth muscle cells in fascia responding to the increased pH of our body). (Ward, 2011)
What the hell does this mean to us?
It means you won’t be able to create tension through the full range of motion of the bench because when the CNS senses pain it inhibits muscle contract. It doesn’t want you to get injured further so it just shuts down whatever hurts. Our upper back provides the stability for the movement and when it has dysfunction and we can’t create tension, we could rely on passive structures for our stability.
It also means that your thoracic immobility will affect the position and function of the scapula, i.e., scapulohumeral rhythm. We might not be able to retract and depress the shoulder blades properly or keep them packed throughout the entire set. That is a big difference. I talked in a previous article about pressing out of your arch. It means you set up properly, but lose that good position after the first repetition.
So you can see how good thoracic mobility is important to our ability to bench and keep the proper positioning and tension.
Here is a killer video with some innovative strategies.
Amazing Upper Back Mobility
Stay tuned for Part 2 of the series when we start to get real-real.
References:
Warm-ups
Killer 20 Exercise Warm-up – The Shawn Phillips
Supercharge Your Workout – LIVESTRONG.com
Breathing
Breathing and Soft Tissue Tension – Patrick Ward


Pressing Considerations for the Older Lifter
Part 2
In Part 1 of this article series, we discussed the importance of a proper warm-up and how immobility in the upper back affects the movement and optimal functioning of your shoulders. In Part 2 we will discuss how to reintroduce tension, and therefore stability, back into the bench press movement pattern.
As you know, the central nervous system or CNS drives everything. You also know that when you have injuries, pain or you’re just generally jacked up, your CNS responds by locking you down. It doesn’t want you to injure yourself further so it inhibits muscle contraction and tries to limit when and how far you move.
This can be a problem because movement will still occur and “override” the present dysfunction, but unfortunately, it happens at a cost. Because the appropriate muscle groups aren’t “firing” the way they should, the supportive musculature kicks in and has to do the main job. But they were only meant to support the prime movers, so they will become strained and overused. This is when form breaks down and bad movement occurs.
As an older lifter, you’ve probably experienced this phenomenon without knowing it. It has just become the norm over the years that you started bouncing the weight off your chest or you’re stopping short about your chest. You have been driven to stay in whatever pain-free range of motion is allowable by your current limitations.
With Tips #1 & #2, we’ve starting to re-establish our potential for loading the bench pressing movement pattern again by including a good comprehensive warm-up and opening up the mobility of our upper back.
Now we will begin to get the muscles contracting again so that they can function the right way and at the right times.
Tip #3: Get More Tension
Once we open up the potential for movement, we need to activate our muscles through the desired (patterned or unpatterned) range of motion. We do this in the push AND pull direction to create a bulletproof and balanced system.
Dynamic isometrics provide us with a great means for getting the muscles firing again, and do so at our own pace. We can setup in different positions along the movement pattern and hold for time, typically 5-10 seconds. As mentioned, we will develop this static strength in both directions. For the bench press, we will use a push-up and inverted row. This tension and strength endurance starts to develop stability along our intended bar path in both directions. Something we had lost due to our previous injuries and long-term poor movement.
After we become proficient at dynamic isometrics we will transition to eccentric quasi-isometrics, or EQI, through the eccentric phase of the press and of the pull (pulling bar to chest). EQI are performed by moving slowly through the eccentric phase of a movement, which elongates the muscles under tension. Because of this, EQI’s are amazing for development deceleration strength potential, injury rehab and for dynamically stretching the restricted upper body soft-tissue associated with an older lifter who has 15-20 years in the workforce. It might seem strange that we are developing the pulling pattern as well as our pressing strength, but as you know from my how to bench video, you must pull the bar to your chest, not just relax and let the weight drop.
Dynamic isometrics involves holding a position (highest) along the push or pull movement pattern for 5-10 seconds and then moving to another position (midpoint) and hold that for the same amount of time. The hold is repeated one more time at the last and lowest position (3/4 range) before a second repetition is completed. For example, for an inverted row, we would hold the chest against the bar for 5 seconds, lower until the arms are 90 degrees for the next 5 sec hold and finally, drop to 3/4 position and hold. This will be repeated for 3 times through for one set and then done for 2-3 sets. Dynamic isometrics should be done with push-ups and inverted rows.
Dynamic Isometrics – Push-ups

Dynamic Isometrics – Inverted Rows

3 sets x 3 repetitions (each rep has three 5 sec hold positions) – rest 60 seconds between sets
Conversely, EQI’s will be more of an intense, longer duration effort. For the inverted row EQI’s, you will hold your chest against the bar to start and only lower as fatigue sets in and because you can’t hold the position any longer. Keep fighting against gravity and don’t reach the bottom of the movement until you can’t hold the tension any longer – or as long as you can maintain proper form. A good target to shoot for is around 30 sec-1 min. For the EQI push-up, you would setup in the 3/4 (right before) lockout position and hold. As the set goes on, you will slowly begin to lower until you reach right above the bottom push-up position. Stop, rest for 60 seconds and repeat 2 more times.
EQI Isometrics – Push-ups
EQI – Inverted Rows
3 sets x 3 repetitions (each rep held for ALAP) – rest 60 seconds between efforts
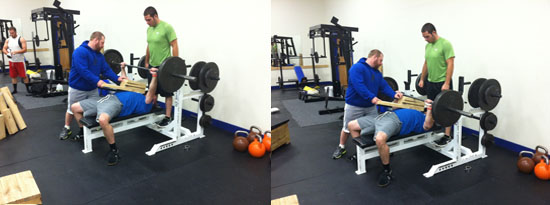
Finally, here is a cool developmental exercise you can use to promote tension at the bottom of the bench, engage the lats for better strength potential and stabilize the shoulders. You will perform isometric rows against a foam roller that is placed under your shirt. This unique variation will also teach you how to keep your thoracic (upper back) extension, while under a heavy bench press. It will also teach you how to row the bar down. Many lifters collapse in the hole because as we discussed, their body won’t allow them to maintain tension. This exercise will re-groove the proper positioning.
Setup on the bench like you’re lifting a heavy weight. Use an unloaded bar and with great tension, row in powerfully INTO the foam roller, maintaining your good positioning. Do NOT collapse at the chest.
Isometric Rows Against Foam Roller

3 sets x 3 repetitions (each rep 5 sec hold) – rest 60 seconds between sets
Tip #4: Push-ups are Beast

Bench, bench bench – I have to bench on Monday’s or my world will fall apart. Nothing could be further from the truth. Straight bar bench is tough on your body. It locks in your wrists, elbows and shoulders and the bar forces you to restrict your movement.
Don’t think of push-ups as a regression to barbell bench pressing, think of them as their own, very unique training tool. Push-ups are much more of a natural movement, as well as, a great core exercise – a double threat.
There are tons of different push-up variations and you are only restricted by your imagination. Create a new push-up variation by:
– overloading them with weight vests, chains, bands or plates
– varying the foot position or height
– varying the hand position or height
– destabilizing the hands or feet; by utilizing rings, med balls or taking away a base of support (i.e., one foot or one arm).
When you can’t bench, do push-ups. They will build insane amounts of muscle and serious strength and give you a break from barbell benching.
Stay tuned for Part 3 in this series where we really get creative!
Pressing Considerations for the Older Lifter
Part 3
I first wanted to say that the feedback for this article series has been overwhelming and I can’t thank everyone enough. You guys are amazing! #teamdiesel-4-life
Now, let’s get back to business.
In our progressive approach, our goal is to allow you to integrate pressing back into your program. To do this safely and with the greatest strength potential, we had to go back to basics.
We started by mobilizing the upper back and incorporating a thorough warm-up. After we opened up our movement potential, we added tension and stability back into the pressing movement pattern.
We will now look at safer ways for you to press and also keep you in a pain-free range of motion (ROM).
Neutral Grip Pressing
Neutral grip pressing is a great way to search for your best pressing position. Like we talked about with push-ups in Part 2, strict barbell benching has its limitations and issues. Moving to a neutral grip – where the palms are facing each other – can provide you with the position that best suits your leverages and current limitations.
Neutral Grip pressing distributes a greater portion of the load across the triceps and takes some strain of the shoulders. It also puts the humerus at a more acute angle as opposed to the flared out position often associated with poorly performed barbell benching.
Neutral Grip DB Benching
Neutral grip dumbbell benching is great for really “loading the lats” – which means setting the upper back on great tension and really locking the shoulder blades back and down.

Swiss Bar Benching
The Swiss bar (or football bar) is another tool that will pay off the first time you use it. It has multiple hand positions for different sized athletes. It allows for endless progressions with bands, chains and dynamic stabilization movements – like chaos benching.

Thick Bar Pressing
Thick bar pressing is another important training method in your arsenal. By opening up the hand, you distribute the weight differently across the wrists, elbows and shoulders. I often recommend thick bar pressing for anyone with upper extremity joint issues or injuries.
Axles, Fat Gripz and thick handled dumbbells can be used for your thick bar pressing. As you can imagine, utilizing these same tools for your pulling movements can develop sick grip strength as well.
Fat Gripz and thick handled dumbbells can be used, in conjunction with, your neutral grip pressing as a double wammy movement.

Fat Gripz Neutral Grip DB Pressing | Fat Gripz Swiss Bar Pressing
I highly recommend both of these movements for older lifters.

Limited Range of Motion
As we discussed, your body is very smart. It likes homeostasis and it knows how to protect itself. Older lifters, who have some substantial time sitting behind a desk and stuck behind the wheel in traffic, are losing a fight against poor thoracic mobility. Unfortunately, this upper back immobility has left them with a inefficient bench setup and pasted them flat on the bench – instead of up in a good thoracic extension postion. This in turn causes more humeral extension and anterior shifting when the barbell is at their chest during a typical barbell bench movement. If this is you, years of benching has left you with shoulder pain and affected your bench technique. What typically happens is the elbows flare during the drive phase and you lose your full body tension during the movement.
In our previous discussion, we said that when the CNS senses pain, it inhibits muscle contraction. Our goal to keep tension throughout the bench pressing movement so you can protect your shoulders and have the greatest potential strength. Much like squatting to a box is a progressional training tool for full squats, board pressing and foam pressing offer us an opportunity to progressively recreate stability where it once has been lost.
Board Pressing
With board pressing, different board levels can be used (1 board, 2 board, 3 board, 4 board) to keep the press in a pain-free range of motion. Some form flaws to look for is when the bar crashes down onto the boards. This means the lifter couldn’t keep tension at that location along the bar path. Also, technique-wise, look to the elbow position. Make sure they don’t flare outward, but instead, stay tucked at approximately 45 degrees to your sides.
Foam Roller Pressing
This is a staple in my program for myself and my older clients. Many times I prefer foam pressing because, unlike board pressing, the foam provides a nice rebound effect in the hole to assist with the drive phase of the lift. Again we don’t want to crash the roller, instead think about easing into the roller with the bar and letting it sink it. Then use the assistance from the foam to drive up and back to the lockout. If you don’t have a partner to hold the foam roller and one to hand off (I always recommend a handoff for the spot), then put the foam roller under your shirt.
One common issue you see with both board pressing and with foam roller pressing is that the lifter will collapse their chest (thoracic extension) as the bar engages the boards or foam. You will want to maintain the tension and upper back extension throughout and do NOT collapse once the bar hits you. On the other side of the movement, at lockout we do not want to press out of our arch.

I hope you enjoyed this section. We will finish up with Part 4 in the series in the next few days.
Pressing Considerations – Part 1
Pressing Considerations – Part 2
Pressing Considerations – Part 3
Pressing Considerations – Part 4 – Coming Soon

Pressing Considerations for the Older Lifter
Part 4
We will now finish the 4-part of the Pressing Considerations for Older Lifters article series. As you have probably guessed, all of these innovative strategies are beneficial for anyone, not just those who have been training for many years. The ultimate goal of the series was to show you that, independent of your current goals and your individual limitations, there is always a way to train.
Not only train, but train with great intensity.
As a quick recap, in Part 1 of the series we talked about warming up and improving mobility. In Part 2, we transitioned into re-establishing tension through the full range of motion for bench pressing and then moved into neutral grip and thick bar pressing with Part 3.
In today’s article, we will focus on 3 excellent tips for improving your pressing potential.
The Slingshot
The Slingshot is an invention created by Mark Bell. Mark is a powerlifter and the owner of Supertraining Gym in CA. He also created POWER! magazine, which I have written articles for in the past.

The Slingshot is created out of the same material as wrist wraps or knee wraps, but it is much bigger. In a nutshell, it is a very easy-to-use version of a bench shirt. It assists you by providing elastic assistance in the hole (off your chest) with the bench and it takes strain off of your elbows and shoulders. When you’re at your weakest, the Slingshot steps in to assist and when you’re at your strongest, it comes off tension.
We use the Slingshot a lot with novice or detrained clients or young athletes. You can get a ton of pressing volume without the associated strain associated with restricted barbell benching. It also provides a great transition into the full execution of the lift or when you’re coming off an injury.

To increase your work capacity and GPP, the Slingshot is also great for repetitive effort work (many times replacing dynamic effort work when your CNS is run down) when performing sets with repetitions greater than 12+ or for high repetition push-ups sets.
Shoulder Safe Dumbbell Spot
In the following video, I show you the top 3 ways to start your dumbbell bench press set. If you have shoulder issues or are unstable on the first repetition, you can use the second or third variation as demonstrated in the video. When I go heavy, I like to use the 3rd variation exclusively. Because many times you’ll see a lifter go for a heavy set, but end up grinding in the bottom trying to get the first rep up. With the third technique, you’ll always start and end in a good strong and safe position.
Elevated Feet
In all of our pressing tips up to this point, we’ve focused exclusively on the upper body. In this final modification, we will talk quickly about the impact of the lower body on pressing strength and setup.
Older lifters are always fighting hip immobility. In fact, it is a daily struggle. They’ve had 15-20 years in the workforce and spent too much time sitting in traffic. Because of this lack of hip mobility, many times they can not get a good setup on the bench without stress or strain on their lower back. The movement that should be happening at the hips is forced and directed to the low back (lumbar region) – which structurally, has a limited range of motion.
But the low back pain you’re experiencing might not be a hip mobility issue – maybe you’ve had a back injury. For example, let’s look at Joe DeFranco. Joe has a back issue and has reoccurring back pain. So when he bench presses, he using this simple modification that I am about to show you.

Elevating your feet by placing them on a step or Olympic plate is a fast way to alleviate stress and strain on your lower back by lessening your arch when you set up on the bench. I have spoken about the required “full body tension” for the bench press in my How to Bench Press article (best on the NET) – and how the bench press is a full body lift. If you can not drive your feet downward during the press, you will be leaving weight on the table and creating an “energy leak” for your strength and power potential. Raising your feet up will help you re-establish proper tension and a good, solid setup – while you continue to work on your hip mobility in your program.
I hope you enjoyed this article series. Please share with your friends and family across Facebook and Twitter.
Smitty
See the other articles in the series:
Pressing Considerations for the Older Lifter – Part 1
Pressing Considerations for the Older Lifter – Part 2
Pressing Considerations for the Older Lifter – Part 3
Pressing Considerations for the Older Lifter – Part 4
By Smitty on January 3rd, 2012
FREE DIESEL NEWSLETTER
- Discover Pain Free, Joint-Friendly Training
- Get Super Effective Workouts and Programs
- Inspirational Life Lessons Each Week
- Effective Habits For Busy Entrepreneurs


id like to see more for men over 40 as im 47 and although ive been in great shape just as littles as 3 maybe four years ago ive Quit for that lenght of time and am wanting to start over again now that im older im not sure what my diet and work out plan of attack should be please help………. thank you Curt