Pressing Considerations for the Older Lifter – Part 3

Pressing Considerations for the Older Lifter
Part 3
I first wanted to say that the feedback for this article series has been overwhelming and I can’t thank everyone enough. You guys are amazing! #teamdiesel-4-life
Now, let’s get back to business.
In our progressive approach, our goal is to allow you to integrate pressing back into your program. To do this safely and with the greatest strength potential, we had to go back to basics.
We started by mobilizing the upper back and incorporating a thorough warm-up. After we opened up our movement potential, we added tension and stability back into the pressing movement pattern.
We will now look at safer ways for you to press and also keep you in a pain-free range of motion (ROM).
Neutral Grip Pressing
Neutral grip pressing is a great way to search for your best pressing position. Like we talked about with push-ups in Part 2, strict barbell benching has its limitations and issues. Moving to a neutral grip – where the palms are facing each other – can provide you with the position that best suits your leverages and current limitations.
Neutral Grip pressing distributes a greater portion of the load across the triceps and takes some strain of the shoulders. It also puts the humerus at a more acute angle as opposed to the flared out position often associated with poorly performed barbell benching.
Neutral Grip DB Benching
Neutral grip dumbbell benching is great for really “loading the lats” – which means setting the upper back on great tension and really locking the shoulder blades back and down.
Swiss Bar Benching
The Swiss bar (or football bar) is another tool that will pay off the first time you use it. It has multiple hand positions for different sized athletes. It allows for endless progressions with bands, chains and dynamic stabilization movements – like chaos benching.
Thick Bar Pressing
Thick bar pressing is another important training method in your arsenal. By opening up the hand, you distribute the weight differently across the wrists, elbows and shoulders. I often recommend thick bar pressing for anyone with upper extremity joint issues or injuries.
Axles, Fat Gripz and thick handled dumbbells can be used for your thick bar pressing. As you can imagine, utilizing these same tools for your pulling movements can develop sick grip strength as well.
Fat Gripz and thick handled dumbbells can be used, in conjunction with, your neutral grip pressing as a double wammy movement.
Fat Gripz Neutral Grip DB Pressing | Fat Gripz Swiss Bar Pressing
I highly recommend both of these movements for older lifters.
Limited Range of Motion
As we discussed, your body is very smart. It likes homeostasis and it knows how to protect itself. Older lifters, who have some substantial time sitting behind a desk and stuck behind the wheel in traffic, are losing a fight against poor thoracic mobility. Unfortunately, this upper back immobility has left them with a inefficient bench setup and pasted them flat on the bench – instead of up in a good thoracic extension postion. This in turn causes more humeral extension and anterior shifting when the barbell is at their chest during a typical barbell bench movement. If this is you, years of benching has left you with shoulder pain and affected your bench technique. What typically happens is the elbows flare during the drive phase and you lose your full body tension during the movement.
In our previous discussion, we said that when the CNS senses pain, it inhibits muscle contraction. Our goal to keep tension throughout the bench pressing movement so you can protect your shoulders and have the greatest potential strength. Much like squatting to a box is a progressional training tool for full squats, board pressing and foam pressing offer us an opportunity to progressively recreate stability where it once has been lost.
Board Pressing
With board pressing, different board levels can be used (1 board, 2 board, 3 board, 4 board) to keep the press in a pain-free range of motion. Some form flaws to look for is when the bar crashes down onto the boards. This means the lifter couldn’t keep tension at that location along the bar path. Also, technique-wise, look to the elbow position. Make sure they don’t flare outward, but instead, stay tucked at approximately 45 degrees to your sides.

Foam Roller Pressing
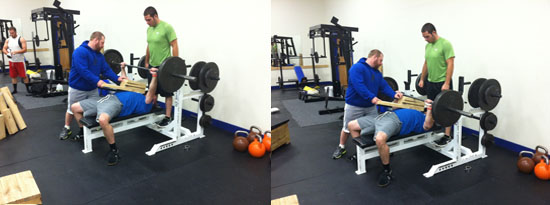
This is a staple in my program for myself and my older clients. Many times I prefer foam pressing because, unlike board pressing, the foam provides a nice rebound effect in the hole to assist with the drive phase of the lift. Again we don’t want to crash the roller, instead think about easing into the roller with the bar and letting it sink it. Then use the assistance from the foam to drive up and back to the lockout. If you don’t have a partner to hold the foam roller and one to hand off (I always recommend a handoff for the spot), then put the foam roller under your shirt.
One common issue you see with both board pressing and with foam roller pressing is that the lifter will collapse their chest (thoracic extension) as the bar engages the boards or foam. You will want to maintain the tension and upper back extension throughout and do NOT collapse once the bar hits you. On the other side of the movement, at lockout we do not want to press out of our arch.

I hope you enjoyed this section. We will finish up with Part 4 in the series in the next few days.
Pressing Considerations – Part 1
Pressing Considerations – Part 2
Pressing Considerations – Part 3
Pressing Considerations – Part 4 – Coming Soon
By Smitty on March 28th, 2012
FREE DIESEL NEWSLETTER
- Discover Pain Free, Joint-Friendly Training
- Get Super Effective Workouts and Programs
- Inspirational Life Lessons Each Week
- Effective Habits For Busy Entrepreneurs


