3 Ways to Crush Your Workout – Part 2

In this second installment of the Crush Your Workout series, we will focus on ladders, low back pain when performing seated pressing variations, and integrated core strength (see Hard:CORE DVD coming soon!).
If you missed Part 1, check it out here:
7 Ways to Crush Your Workout – Part 1
Let’s get started.
Tip #1: Chutes and Ladders
Performing ladders, a simple progressive escalating or descending rep scheme, in your workout is a great way to get a lot of good quality work done in a short period of time. You should incorporate ladders frequently – especially with semi-private or group training – because the progressive repetition scheme is also typically accompanied with a increased rest period. The ascending rest periods means that you will successfully achieve a high volume of good quality repetitions for whatever exercise you are doing.
How do you perform ladders?
You pick an exercise and do one of the following three options:
Option 1: Progressively increase the number of repetitions as you increase the weight
Example 1:
Exercise: KB Clean & Press
Set 1: 20kg x 1 rep, no rest
Set 2: 22kg x 2 reps, no rest
Set 3: 24kg x 3 reps, no rest
Set 4: 26kg x 4 reps, no rest
Set 5: 30kg x 5 reps, REST* (full recovery)
* At the top end of the ladder, you have the option to descend back down to the starting set (Set 1) one rep at-a-time OR start over at Set 1.
Like this:
1
12
123
1234
12345
1234
123
12
1
Option 2: Progressively increase the number of repetitions as you decrease the weight
Example 2:
Exercise: Tricep Extensions
Set 1: Full Cable Stack x 1 rep, no rest
Set 2: Full Cable Stack minus 10 lbs x 2 reps, no rest
Set 3: Full Cable Stack minus 20 lbs x 3 reps, no rest
Set 4: Full Cable Stack minus 30 lbs x 4 reps, no rest
Set 5: Full Cable Stack minus 40 lbs x 5 reps
Continue onward until you reach 10 repetitions at the top end of the ladder and then REST* (full recovery) before repeating or moving on to the next exercise.
* At the top end of the ladder, you also have the option to ascend back up, increasing the weight as far as you can go without compromising form.
Option 3: Progressively increase the number of repetitions as the weight stays the same
Example 3:
Exercise: Pull-ups (with a group of 4-5 lifters)
Set 1: Bodyweight Pull-up (or loaded) x 1 rep x Rest long enough so that each member in the group gets 1 repetition
Set 2: Bodyweight Pull-up (or loaded) x 2 reps x Rest long enough so that each member in the group gets 2 repetitions
Set 3: Bodyweight Pull-up (or loaded) x 3 reps x Rest long enough so that each member in the group gets 3 repetitions
Set 4: Bodyweight Pull-up (or loaded) x 4 reps x Rest long enough so that each member in the group gets 4 repetitions
Set 5: Bodyweight Pull-up (or loaded) x 5 reps x Rest long enough so that each member in the group gets 5 repetitions
* At the top end of the ladder, you have the option to descend back down to the starting set one rep at-a-time OR start over at Set 1 with 1 repetition
With group ladders, there are a ton of benefits:
– each rep is PERFECT because fatigue is managed by the flow of the ladder. As the reps increase, so does the rest period, i.e. each person in the group is hitting more reps as the ladder increases so that increases the time before your next set.
– short, high efficient workouts
– any exercise, any piece of equipment can be used
– balance in the movements, typically ladders are setup for one exercise, but you can “sneak” in some other simple, recovery movements immediately after each of your attempts. You’ll see in the video I placed band pull-aparts after each push-up set.
Previous articles on Ladders and bodyweight training:
http://www.dieselcrew.com/big-arm-workout-mass-building-workout-for-arms
http://www.dieselcrew.com/running-the-rack-or-hitting-ladders
https://www.dieselsc.com/killer-bodyweight-training-workout-effective-group-training-with-ladders/
Tip #2: Reduce Low Back Pain When Pressing
A common issue with performing seated pressing variations is that some lifters experience low back pain or discomfort. That is why most times, we recommend performing standing variations. That, and standing variations offer a greater core commitment which is always a bonus.
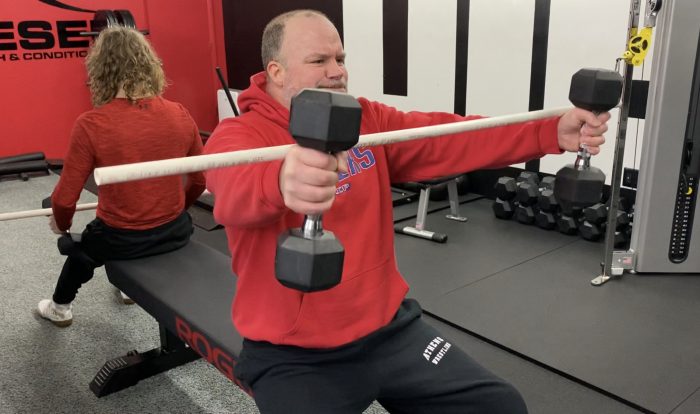
Here is a very simple modification for alleviating back pain when you’re performing incline bench press, seated military press, or any seated pressing variation. As you can see from the first picture, the conventional setup for the incline bench puts the feet close to the hips or sometimes at approximately 90 degrees of knee flexion. In both of these positions, many lifters compensate (trying to shorten the range of motion) or are forced to compensate (hip flexors too tight forcing the pelvis into anterior pelvic tilt) which causes the low (lumbar) to move into hyperextension. Also, in this position, the lifter is not setup to optimally create lower body tension and drive their feet downward into the floor to anchor ourselves.
Conventional Setup
Taking a note from the old strongman contests, we will change our foot position to help our low back stress. By moving our feet outward, we almost assume a standing position which allows our torso to become more neutral and ‘pillar.’ This will help with the alignment of our hips and allow for more powerful abdominal bracing with active engagement of the torso stabilizers. This modified position also improves the potential for full body tension because the feet are flat and able to set the lower body. I like to move the feet out – think sumo position – and point the toes out slightly.
New Foot Position When Pressing
Notice the low back alignment and active lower body engagement.
==>Try this variation out and leave a comment with how it felt and if you were able to create more stability for the set.
Tip #3: Integrated Core Strength
With the upcoming release of the new Hard:CORE system, I wanted to show you a fantastic integrated core strength exercise. As I’ve written before, lunges are an amazing unilateral lower body training exercise that require balance and develops the quads, hamstrings and glutes. Lunges also “reveal” or give insight into the lifter’s current hip and ankle (stability and mobility), as well as, their knee (stability and mobility) and core (torso) stability. With the conventional exercise, the load acts vertically (with an anterior deceleration component for forward lunges) in the sagittal plane while balance and lateral core stability is required in the frontal plane of movement. The dysfunction at the hips, ankle, and a lack of core stability could result in certain muscle groups not working as great as they’re supposed to; and this could affect the execution and optimal body positioning throughout the movement.
For this article, we will provide an advanced alternative to the double kettlebell forward lunge which will intensity the lateral (anti-lateral flexion) core stability component. It will also force the athlete to fire their lower body musculature at different intensities dependent upon the difference in load from side-to-side.
Offset Double KB Lunges
Try out the ladder sequences, the different foot position for seated pressing and the offset kb lunges and let me know what you think in the comments below. You must continue growing and adapting in the gym if you want to have longevity. You must also realize that you are an individual who sometimes requires modifications to standard exercises. These are a few tried and true “cool things” I’ve learned over the years. Don’t be afraid to experiment on your own too because the progressions and potential modifications are endless – especially for those motivated few.
Rage against the dying of the light,
Smitty
By Smitty on June 6th, 2012
FREE DIESEL NEWSLETTER
- Discover Pain Free, Joint-Friendly Training
- Get Super Effective Workouts and Programs
- Inspirational Life Lessons Each Week
- Effective Habits For Busy Entrepreneurs






Helpful article Jim smith, always is.
I have a little question about the pressing setup. Wouldn’t this set up increase the possibility of getting shoulder problems ?
Absolutely not. It will set your shoulder blades in a good position to move unrestricted.
Good tip on the lower back pain issue. I slipped a disc a few years ago and am always looking for ways to train that don’t aggravate the pain.
If you do suffer from back pain lie down with an ice pack on it (a bag of frozen peas works well). This is kind of obvious but we often overlook these things. It is not a cure and it is obviously better not to do something that hurts in the first place. But it works wonders. People often only consider ice at the time of the initial injury.
Thanks for reading James.
Thank you for another useful and detailed article. I am so grateful to have fitness resource that is not obsessed with fat/weight loss or “toning.”
*a fitness resource
sweeet