How to Squat

How to Squat
Squats (along with deadlifts) are one of the best exercises (compound, ground-based movements) that you can include in your strength program. If done right, there are many benefits of performing squats. Squats don’t only build leg mass, they develop real-world core strength and mental toughness.
Types of Squats
Back Squats

Front Squats

Zercher Squats

Powerlifting Squats

Box Squats

Goblet Squats

Rear Foot Elevated Split Squats

One Leg Squats
(courtesy benbruno.com)

Wall Squats

How to Load the Squat
A barbell can be loaded with:
– straight weight (barbell + olympic weights)
– chains
– elastic bands
Odd objects can also be used for squats:
– sandbags
– kegs
– kettlebells
– rocks
Odd objects can be held in different positions when you squat with them:
– shouldered
– bear hug
– overhead
– front racked
– zercher
Different Squat Bars
– standard barbell
– cambered squat bar
– giant cambered bar
– safety squat bar (SSB)
– spider bar (combination of SSB and giant cambered bar)
Squat Benefits:
– build strength and enhance power potential
– add massive lower body muscle
– develop core strength and rigidity
– injury prevention
– knee tracking, stability
– glute, quad, hamstring activation
– ankle mobility (full back squats)
– hip mobility (box squats)
– confidence and mental toughness
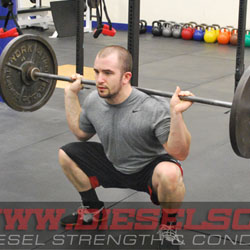
How to Squat:
High Bar Back Squats
1. Setup under the center of the bar with it resting on your upper traps
2. Place your hands wide on the bar, squeeze your back tight as you pull your hands toward the center as far as you can
3. Lock hands on bar with very tight grip
4. Rotate elbows down (facing the ground) and straighten the wrists
5. Take a deep belly breath and force your abdominals outwards while you brace your torso (while also engaging your lats)
6. Unrack bar and step backward, getting into your stance with as minimal steps as possible
7. Feet should be approximately shoulder width apart with toes pointed outward at a comfortable angle for your body type, typically any where from 10 – 45 degree angle
8. Let air out, and reset air pulling chest upward and ensuring elbows are facing down, head should remain forward to slightly up
9. With weight on the middle of your feet (not toes) shift hips backward
10. As the hips move backward, drop down into the hole maintaining an upright torso position tracking the knees over your toes (imagine there is a string attached to your chest keeping it up and facing forward)
11. Descend until you reach the bottom position (as far as you can go)
12. Still holding your air, drive upward out of the hole locking the hips forward at the peak with a powerful glute contraction.
Repeat steps 4-12.
Powerlifting Squats
1. Setup under the center of the bar with it resting on your lower traps
2. Place your hands wide on the bar, squeeze your back tight as you pull your hands toward the center as far as you can
3. Lock hands on bar with very tight grip
4. Rotate elbows down (facing the ground) and straighten the wrists
5. Take a deep belly breath and force your abdominals outwards while you brace your torso (while also engaging your lats)
6. Unrack bar and step backward, getting into your stance with as minimal steps as possible
7. Feet should be approximately 1 to 2 foot wider than shoulder width apart with toes pointed outward at a comfortable angle for your body type, typically any where from 10 – 45 degree angle
8. Let air out, and reset air pulling chest upward and ensuring elbows are facing down, head should remain forward to slightly up
9. With weight on the middle of your feet (not toes) shift hips backward
10. As the hips move backward, knees are forced outward, opening the hips with the feeling of “spreading the floor”.
11. Drop down into the hole maintaining an upright torso position tracking the knees over your toes and without the knees translating forward
12. Imagine there is a string attached to your chest keeping it up and facing forward
13. Descend until you reach a parallel or slightly below bottom position
14. Still holding your air, drive upward out of the hole locking the hips forward at the peak with a powerful glute contraction.
Repeat steps 5-14.

Simple Squat Progression
Unfortunately, even today with everything we know, there are still some coaches that program the right exercises at the wrong time. They still allow young athletes and novice lifters to enter their program and immediately start performing barbell squats, deadlifts and bench presses.
The correct protocol has to first start with an assessment and then a progressive approach must be employed to development the athlete’s strength foundation and movement proficiency. It is only after the athlete demonstrates control (stability) through the required mobility (range of motion) of the strength training movement pattern, can you begin to overload the exercise.
Today we will look at a time-tested squat progression to get you and your athletes performing good full-range squats.
The Simple Squat Progression
At Diesel, we never throw an athlete under the bar until I can see the following:
– They understand bracing
– They understand tension (see Tip #4)
– They can demonstrate a hip hinge pattern with a neutral posture (loaded and unloaded)
– They can perform a bodyweight wall squat with a neutral torso (hips, spine, head)
Once we get to this point, we can start thinking about where we want to go with the squat and how we’re going to get there. We will use a simple seven-step exercise progression which will allow us to:

7 Levels of Progression
Here is the easy-to-following exercise sequence for progressing to a full barbell squat.
Step 1: Wall Squats
Wall squats are a great way to teach an upright squatting pattern while targeting strength mobility of the hips and core stability. This video provides some excellent progressions for the wall squat series.
Step 2: High Box Goblet Squats

After we develop the mobility, bracing and neutral posture for the squat pattern, we can begin to overload the pattern in a limited range of motion (ROM). This will also test the athlete’s core stability, bracing and breathing proficiency.
Step 3: Parallel (to Low) Goblet Squat

Now we start to increase the ROM by lowering the box. Increasing the ROM develops strength and mobility in this new range of the movement. The key coaching cues for the athlete are to not “crash the box”, but rather “touch and go”. The focus has to be on tension and stability.
Step 4: Goblet Squats

We started the squat pattern with the wall squats and now we cement the pattern with loaded goblet squats through a full range of motion.
Step 5: Double Kettlebell (KB) Squats

Full squatting with a barbell requires great tension in the upper back. We can simulate this anterior-loaded movement with two kettlebells in the racked position. This is a great anti-flexion (hips), anti-extension (lumbar spine) movement (Robertson, Complete Core, 2011) that forces the athlete to a greater level of tension, in preparation for barbell squats.
Step 6: High Box Squats

We’ve finally made it to the barbell with the introduction of high box squats. Box squats are a great progression tool for full squats (not to be confused with powerlifting box squats) because you can use the mats as indicators. We will start high (limited ROM) and slowly take away the mats (full ROM) as the athlete demonstrates proficiency at each level.
Step 7: Parallel (to Low) Box Squats

We lower the box height even further and still throw out the same cues; do not “crash the box” and “touch and go”. This will ensure tension and control throughout the exercise.
Time to Get Real
We’ve made it! Your athlete is finally ready to perform full squats. The question is, could they have full squatted before we reached this point in their development? Of course, this is only one progression and every athlete could require a different strategy. But this is a general progression we’ve used with all of our athletes with great success. It will provide you with a foundation, a good starting point to work from and allow you to insert other exercises to address individual weaknesses.
The Best How to Squat Page on the Net – CLICK HERE
For some great full squat video tutorials, here is a 5-video sequence:


How to Squat Properly Without Wrecking Your Knees

How to Squat Training Series
When you start looking at incorporating squats into your workout or into the programs for your athletes, you’ll quickly find that squats, like most compound movements, can be broken down into smaller “pieces”. In fact, that is exactly how you need to teach all lifts; especially compound lifts (those involving multiple muscle groups across multiple kinetic segments).
Progressively linking these individually “perfected segments” will allow you to not get overwhelmed. But rather easily move from segment to segment until the full execution of the lift is performed.
In this first installment of “How to Squat” we will talk about the position of the elbows.
How to Squat Video Series Summary
How to Squat – Squat Tip #1 – Elbows Down, Chest Up
http://www.youtube.com/watch?v=xNGnxRxCWPo
How to Squat – Squat Tip #2 – Setting the Lats
http://www.youtube.com/watch?v=edmMGoVIBW8
How to Squat – Squat Tip #3 – Setting the Lower Back
http://www.youtube.com/watch?v=qVNMMJnotnQ
How to Squat – Squat Tip #4 – Fewest Steps Possible
http://www.youtube.com/watch?v=sm1OYuX0-sI
How to Squat – Squat Tip #5 – The Double Breath
http://www.youtube.com/watch?v=jUka0l0BFf8
Tip #1 – Elbows Down / Chest Up

After you unrack the bar and before you even attempt to move into the squat, you must take care of your elbows and chest. You must drive the elbows down. Drive them down until they are facing the ground. As you drive the elbows down, you’ll notice something else; your chest rises. This is a good thing. In fact, you need to accentuate this thoracic extension.
Driving the elbows down will help you engage the lats for more stability and tension. The lats are an important part of the “core“. This, along with pulling your chest up, will keep your head up when you are in the bottom (hole) of the squat.
Because what will happen when your elbows drift up and back?
Your torso will fall forward and the hips will rise too early when you are drive upward. You see this with athletes who don’t have good torso strength or immobile ankles, hips and upper back. This might be ok when the weights are light, but will put a lot of stress on the lower back when the weights get heavier.
Remember “perfect practice makes perfect”, so keep drilling form.
Stay tuned for Tip#2 in the “How to Squat” series.
How to Squat – Tip #1 – Elbows Down / Chest Up Video
 |
 |
How to Squat – Tip #2 – Setting the Lats

How to Squat Training Series
In the next installment in the “How to Squat” video series we will look at the little known component of setting the lats. This is one of the most misunderstood and under utilized form corrections when a lifter or athlete engages in any type of squat.
But it is very important.
Let’s first look at the types of squats and then we’ll talk about how to engage the lats.
Types of Squats
- full back squats
- powerlifting squats
- box squats (front, back)
- front squats
- jump squats
- goblet squats
- zercher squats
- overhead squats
- pistol, i.e. one leg squats
Tip #2 – Setting the Lats

When the lifter prepares to squat, they must first create tension. This is especially true if the weight is a max or near maximal effort. In the first part of the how to squat series we learned about pulling our elbows down and our chest up. As we do this, the next step is to squeeze the bar very hard. Not only squeeze the bar hard, but engage the lats by pulling the bar into your upper back. This tension is so important for stabilizing the torso, protecting the spine, helping you to remain upright and increasing the amount of weight you can lift.
In fact, renowned back special Stuart Mcgill states that the simple act of engaging the lats during the squat can add 20-30lbs to your squat weight immediately.
Remember, more tension equals more strength.
Stay tuned for Tip#3 in the “How to Squat” series where we teach you what to do with the hips.
How to Squat – Tip #2 – Setting the Lats Video
 |
 |
Tip #3 – Setting the Lower Back

How to Squat Training Series
In the next installment in the “How to Squat” video series we will look at setting the lower back. This, along with intra-abdominal pressure and bracing, is the final piece of stabilizing the torso.
Setting the lower back is as easy as slightly arching the lower back (into it’s natural curve) while taking a huge breath and isometrically contracting the abdominals simultaneously.
Tip #3 – Setting the Lower Back

When you first watch the video it might look like Ryan is overarching his lower back. He is in fact, just setting it hard into its natural position and holding it. Most times when lifters unload the bar from the way they assume a posterior pelvic tilt under the weight. This position isn’t optimal especially when we talk about stabilizing the lower back and pelvis prior to squatting. He has to consciously move his pelvis back to neutral and “set it”. And like we stated, this is a dual effort with the bracing of the abdominals and his breathing pattern.

Coaching Cues

Remember, don’t just squat down. You will lose tension!!! Move the hips slightly back (loading the hamstrings and glutes and setting the back) and spread the knees. The act of spreading the knees will lower you (under tension) into the hole.
Stay tuned for Tip#4 in the “How to Squat” series where I tell you why it is so important to “save your CNS” for the work ahead.
How to Squat – Tip #3 – Setting the Lower Back Video
|
|
Tip #4 – Fewest Steps Possible

How to Squat Training Series
In this fourth video, next to last in the series, we will talk about fewest steps possible.
Tip #4 – Fewest Steps Possible
This tip is so important for many reasons. Some of which include; safety, proficiency of movement, systematic and efficiency. The goal is to move from the rack, to your spot for squatting in two steps. This means your feet should be set in the proper width, at the right angle and ready to go.
Safety
When you are handling heavy weight on your back there is a potential for injury. This is a fact that you can’t get around. So it is logical to want to move slowly, confidently and minimally. There are potential balance issues, joint integrity issues and core stability issues.
Proficiency of Movement
This is another example of efficiency of movement and a lesson of perfect practice. If we practice taking the fewest steps possible when un-racking the bar with our sub-maximal squat training, it will become automatic with the maximal efforts. Proficiency of movement means executing the strength training movement pattern without variation or “leakage” of tension.
Systematic
As stated previously, when performing a complex movement it benefits the lifter if we can break it down into “smaller segments”. These smaller segments become the coaching cues (think mantra) that the lifter can repeat over and over in their head during the movement. For example:
1. Elbows down, chest up
2. Tension on the lats
3. Hips Back
4. Spread the knees
Now it is becoming very clear. All of these squat training tips are starting to link together and build our mantra.
Efficiency (Reserving Energy)
Instead of thinking of squatting as a bar on your back, think of it as tension on the body. This tension awakens the CNS (central nervous system) and engages a certain amount of motor units and muscle fibers; dependent upon the intensity (load) of the effort. If your walk out from the rack takes you upwards of 10-15 seconds of bobbling, re-stabilizing and setting up, you are wasting essential energy stores and fatiguing the CNS. This is the exact opposite of what you should be doing. You should get into your setup with the most amount of potential CNS excitability and available energy (ATP/CP) for the effort.
Coaching Cues
Remember, efficiency of movement and use these squat tips as your step-by-step guide as you perform the lift.
Stay tuned for Tip#5 (the final installment) in the “How to Squat” series. This one will finalize your setup for the squat.
How to Squat – Tip #4 – Fewest Steps Possible Video
|
|
Tip #5 – The Double Breath

How to Squat Training Series
In the fifth and final video in the “How to Squat” series, we will discuss the double breath technique. This is a very essential piece of the squat sequence because it works with the tension created in the hands and across the upper back to hit the perfect squat.
Tip #5 – The Double Breath
There is a collaborative effort between your breathing patterns and the tension required to stabilize the torso during the squat movement pattern. It is very simple. You cannot use the breath you used to unrack the bar for your first squat repetition if you are walking out the weight. (side note: squatting on a monolift is a different story). Your breath must be reset, so why not work it into your squat as a priority in your technique cues.
This means it will become a separate cue that you will remember in your setup.
As your diaphragm contracts and your lungs expand, you pull in air into your lungs. When you hold this air and brace your torso, the collaborative tension when you engage all of your torso stabilizers (RA, IO/EO, TA, QL, Lats, Erectors) – especially the rectus abdominus whose lateral tendons (anti-rotator, stabilizer “buttress shear effectively in flexion” (McGill) and create “hoop stresses” (Chek)) work to create intra-abdominal pressure. This is your natural “lifting belt”.
So you can see resetting the breath is so important for the safety of the lift. Not only safety, but creating the potential for displaying maximal strength or power.
Coaching Cues
Remember, efficiency of movement and use these squat tips as your step-by-step guide as you perform the lift.
1. Tension on the bar
2. Take huge breath of air and brace your abs outward (1st breath)
3. Unrack bar from power cage
4. Step back with fewest steps possible, think “1”, “2”
5. Elbows down, chest up
6. Re-tension your grip on the bar, lats and upper back
7. Take huge breath of air and brace your abs outward (2nd breath)
8. Hips Back
9. Spread the knees
10. Hit the depth and drive out of the hole
11. Repeat steps 5-10 for desired reps
References
Ultimate Back Fitness and Performance
How to Squat – Tip #5 – The Double Breath Video
|
|
Squat Considerations:
- I am Falling Forward in the Hole
- Technique – Keep the elbows facing downward, the chest up and don’t let your air out. If the elbows rotate back, you’ll fall forward. Work on your hip mobility and brace the torso.
- Strength – incorporate more 45 degree back extensions, good mornings (with various bars), kb pullthroughs, pull-ups, bottoms up squats or chain suspended squats and rack pulls.
- I Get Stuck in the Hole
- Technique – You might be losing tension because of a hip mobility issue or just a technique issue. Brace hard and start the movement by shifting the hips backward slightly and push the knees outward as you descend into the hole. Do NOT relax in the hole, keep the tension and drive powerfully upward.
- Strength – You must incorporate more full range back squats and improve your ankle mobility. Work on wall squats to learn properly torso position and supplement with single leg variations.
- I Can’t Get Low Enough
- Technique – For back squats, experiment with different foot widths to accommodate your individual leverages. You need to find your particular groove for the squat movement. You can also try a lower bar placement to see if that might work to keep your torso in a better position.
- Mobility – To perform a full range squat, you’ll need appropriate ankle, hip and upper back mobility. Wall squats, goblet squats and incorporating a ton of warm-up / activation strategies will go a long way for improving the integrit of your squat movement.
Importance of a Good Warm-up
Make sure you before you even grab the bar to squat, you perform some type of foam rolling / lacrosse ball massage, a variety of full body dynamic mobility movements and get a “good sweat going”. Because the squat is so intensive and stressful to the body, you must prepare thoroughly before performing any type of squat. And don’t forget, the rigidity and fixed nature of most barbells require the lifter to hold certain upper body positions (under load) for the duration of the set; i.e., external rotation of the shoulders. This means a warm-up primarily focused on the lower body isn’t going to cut it. The warm-up should target the entire body and last upwards of 15 minutes.
Check out AMPED Warm-up, the best selling and most comprehensive warm-up system ever created!

Benefits of a Thorough Warm-up:
– CNS excitement
– muscle activation
– prepares joints, muscles and connective soft-tissues for activity
– negating poor posture and excessive short range of motion (ROM) movements of the day
– mental preparation
– improved performance
– reduce injury potential
Accommodating Resistance
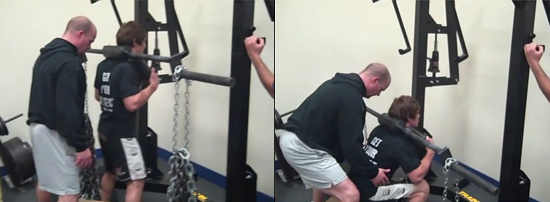
Accommodating resistance, or resistance that matches the lifter’s natural strength curve, is an advanced method of training that powerlifters use to build insane strength and power. This technique, which typically incorporates elastic bands or chains, adds more weight to the lift at lockout (when leverage is better and the lifter is at a better advantage) and less weight near the bottom of the lift (i.e., in the “hole” when leverage is bad and the lifter is weakest). This is an advanced training method that should not be used by beginners. Beginners should focus on the basics and incorporate more volume. Elastic bands vary in length, width and strength and chains are typically 5/8″ linkage x 4′ (approx. 20lbs each).
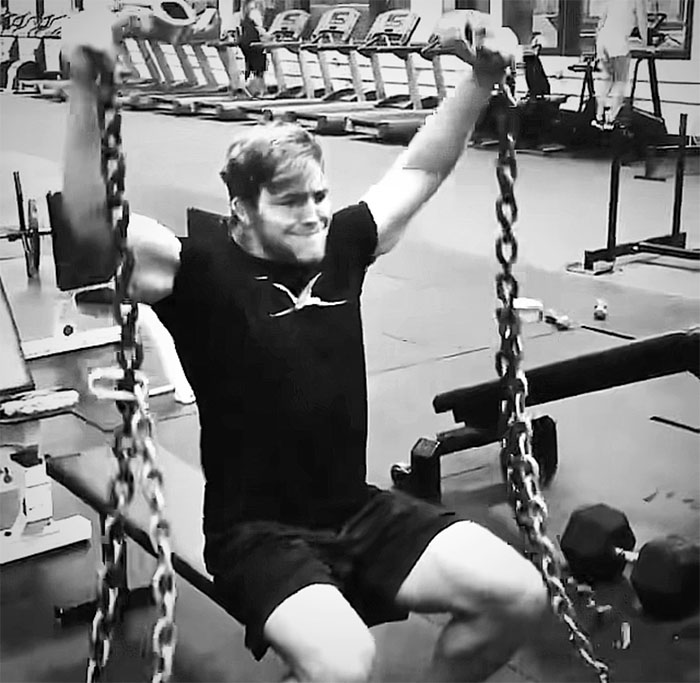
Chain Squats
Band Squats
COMING SOON
Footwear
Footwear is very dependent upon the type of squats you’re going to be doing. When doing high bar back squats a great degree of ankle, knee and hip flexion is required. Powerlifting squats are done to a box typically at parallel (where the lifter’s quads hit a spot where they are parallel to the floor or the hip to be lower than the knee).
Converse Shoes
Preferred for powerlifting box squats because the sole is flat and they provide slight stability to the ankle.

Weightlifting Shoes
Due to the heel allowing a deeper squat (removing the “lack” of ankle mobility issue to hit depth), weightlifting shoes are preferred for high bar back squats. Bowling shoes can also be substituted as a cheaper alternative.

Grip Considerations
Lifters always miss the important part of grip during a squat. In fact, most times they just let the bar “rest” in their hands due to flexibility issues (of the wrist, elbows, shoulder or upper back) or just bad technique.
You MUST squeeze the hell out of the bar, not only for safety reasons, when the weight gets heavy, but also it allows you to squat more weight. Tension created in the hands carries across the arms to the shoulders into the upper back. In fact, Stuart Mcgill has studied the fact that tension created in the upper back, specifically the lats during the squat, can provide a 30-50 lb carryover to the load. Just by increasing your tension! It all starts in the hands.
Bar Placement
Low Bar Placement

Typically used for powerlifting squats. The goal is to maximize your leverages, so the closer you can get the load to your own center of gravity (COG) and minimize the moment arm (distance from the bar to your hips (ie. the fulcrum), the more weight you can lift.
High Bar Placement

Because of the up/down bar path and upright torso positioning of a typical high bar back squat a high bar position is preferred. This not only allows the lifter to move their hands in and elbows down, tightening up the upper back (and creating more tension) but also keeps the torso more upright. If the bar was lower, the lifter would have a great tendency to fall forward in the hole.
Scientific Studies On The Squat
A biomechanical comparison of the traditional squat, powerlifting squat and box squat.
Swinton PA, Lloyd R, Keogh JW, Agouris I, Stewart AD.
Source
School of Health Sciences, Robert Gordon University, Aberdeen, United Kingdom; 2School of Social and Health Sciences, University of Abertay, Dundee, United Kingdom; 3Sport Performance Research Institute New Zealand, School of Sport and Recreation, Auckland University of Technology, Auckland, New Zealand.; 4Faculty of Health Sciences and Medicine, Bond University, Gold Coast, Australia; 5Centre for Obesity Research and Epidemiology, Robert Gordon University, Aberdeen, United Kingdom.
Abstract
The purpose of this study was to compare the biomechanics of the traditional squat with two popular exercise variations commonly referred to as the powerlifting squat and box squat. Twelve male powerlifters performed the exercises with 30, 50 and 70% of their measured 1RM, with instruction to lift the loads as fast as possible. Inverse dynamics and spatial tracking of the external resistance were used to quantify biomechanical variables. A range of significant kinematic and kinetic differences (p<0.05) emerged between the exercises. The traditional squat was performed with a narrow stance, whereas the powerlifting squat and box squat were performed with similar wide stances (48.3 ± 3.8cm, 89.6 ± 4.9cm, 92.1 ± 5.1cm, respectively). During the eccentric phase of the traditional squat the knee travelled past the toes resulting in anterior displacement of the system center of mass (COM). In contrast, during the powerlifting squat and box squat a more vertical shin position was maintained, resulting in posterior displacements of the system COM. These differences in linear displacements had a significant effect (p<0.05) on a number of peak joint moments, with the greatest effects measured at the spine and ankle. For both joints the largest peak moment was produced during the traditional squat, followed by the powerlifting squat, then box squat. Significant differences (p<0.05) were also noted at the hip joint where the largest moment in all 3 planes were produced during the powerlifting squat. Coaches and athletes should be aware of the biomechanical differences between the squatting variations and select according to the kinematic and kinetic profile that best match the training goals. SOURCE: http://www.ncbi.nlm.nih.gov/pubmed/22505136
Supplemental Exercises
Learning the Hip Hinge
Upper Back Mobility
Hip Mobility
Back Extensions / Back Raises
Band Resisted Hip Thrusts
Good Mornings
Heavy Prowler
____________________________________________________________
Sample Lower Body Training Workouts
Sample Workout 1
Activation
Foam Marching
High Hurdles
Lunges
Warmup
Jump Rope
Pull-ups
Banded Good Mornings with Iron Cross
Workout
1) Back Squats, 4×8
2a) RDL’s, 3×12
2b) DB Military Press, 3×10
3a) Bulgarian Split Squats, 2×20
3b) Push-up Pluses
Rehab
Hip Mobility
Glute Activation
_____________________________________________________________
Sample Workout 2
Soft-Tissue
Foam Roller
Lacrosse Ball
General Warm-up
Sled Drags – 200 yards forward, with chest presses
Sled Drags – 200 yards backward, with rows and external rotations
Kettlebell Combo – swing to squat to overhead press
Specific Warm-up
Light Worksets of Actual Exercises
Workout
Primary Movement
Yoke Bar Squats
Supersetted with Jump Stretch band tricep extensions
2a) One Leg Squats to Bench
2b) Power Wheel Lying Leg Curls
3a) Rope Climbs
3b) Hindu Push-ups
4) Shrugs-o-Death
Shrug for 10 seconds
Hold for 10 seconds
Shrug for 10 seconds
Hold for 10 seconds
Keep Repeating until death
5) Ab Roller – 3×10
Cool Down
Stretching
Foam Roller
Hip Stretches
Lacrosse Ball
By Smitty on September 5th, 2011
FREE DIESEL NEWSLETTER
- Discover Pain Free, Joint-Friendly Training
- Get Super Effective Workouts and Programs
- Inspirational Life Lessons Each Week
- Effective Habits For Busy Entrepreneurs


Epic n’ awesome!
Awesome stuff! I’ve been reading articles and watching squat videos for weeks now but this one was the most helpful. Keep up the good work!
Awesome article!! I loved it! Keep up the good work!
Sweet! The most comprehensive post I’ve ever seen on the squat. If you can’t nail the squat after reading that, go back to school!
Well done diesel crew!!
Smitty, The bench, squat and deadlift articles are AWESOME! I love that you added the Rick Walker stuff in too(I think that is his name LOL). I remember that was a bonus from a long time ago! Keep up the good work, you are doing an amazing job educating people! Excited for POWER, see you soon Smitty!
-Coach Gaglione
Wow mate! Great article. A fantastic reference I can’t believe you took the time to put all that together! Brilliant!
As usual you guys have outdone yourselves, in a good way! Amazing detail on this post, you are truly benefiting the Strength and Conditioning community with these posts. Keep’em coming!
thank you very much for providing all this information free, i cannot wait to put it to the test
Great stuff. This really helps out. You don’t realize everything that goes into doing a squat the right way till you rack your back.
Thanks
Tim
Great info!! Thanks alot!!… can’t wait to put it to the test!
‘The’ best resource on squats on the internet…Thanks a lot for making it available for everyone to read and learn